Mastering the Art of Deviled Eggs: A Guide to the Ultimate Party Snack
Few appetizers command attention quite like a platter of perfectly crafted deviled eggs. These creamy, savory bites are a quintessential crowd-pleaser, gracing tables from casual game days and family potlucks to elegant holiday feasts. While their simplicity might suggest an easy feat, perfecting deviled eggs involves a meticulous approach, transforming humble hard-boiled eggs into a gourmet delight. This comprehensive guide will walk you through every essential step, from achieving the ideal egg foundation to crafting a filling that’s smooth, flavorful, and unforgettable.
Whether you prefer them zesty, subtly sweet, or with a fiery kick, the journey to exceptional deviled eggs begins with a foundational understanding of the process. We'll delve into the science behind perfectly cooked eggs, the secrets to a velvety filling, and creative ways to elevate this beloved classic, ensuring your next batch is nothing short of spectacular.
The Foundation of Flavor: Achieving Perfectly Cooked Eggs for Deviled Eggs
The success of your deviled eggs hinges entirely on the quality of your hard-cooked eggs. Unlike a jammy egg designed for toast, deviled eggs demand a firm, pale yellow yolk that can be smoothly incorporated into a filling. Getting this right is a scientific endeavor, and we've put the methods to the test to ensure flawless results every time.
The Boiled Method: A Scientific Approach to Perfection
Achieving perfectly cooked eggs isn't about guesswork; it's about precision. Here's a tested method that guarantees consistent results:
- Start with a Boil: Bring a pot of water to a rolling boil. The size of your pot is important – ensure enough room for the eggs to move without overcrowding. Overcrowding can lead to uneven cooking and cracks.
- Remove from Heat: Once boiling, remove the pot from the heat source. This controlled environment prevents vigorous boiling from cracking the shells.
- Gently Lower Eggs: Carefully lower cold eggs into the hot water. Using cold eggs helps prevent the yolks from shifting, keeping them centered.
- Cover and Let Stand: Immediately cover the pan with a lid. Let the eggs stand in the hot water for exactly 12 minutes. This method uses residual heat to gently cook the eggs to a firm, solid state without overcooking.
- Halt the Cooking: After 12 minutes, promptly lift the eggs out of the hot water and transfer them to a bowl of ice water. This crucial step, known as "shocking," immediately stops the cooking process.
An Alternative: Steaming for Success
Steaming is another fantastic method that often results in easier-to-peel eggs. It also provides a gentler, more even heat distribution:
- Prepare the Steamer: Pour about 1 inch of water into a shallow pot and bring it to a simmer. Line the pot with a steamer basket.
- Arrange Eggs: Carefully arrange large eggs in the basket in a single, even layer.
- Steam: Cover the pot and steam over low to medium-low heat for 12 to 15 minutes.
- Ice Bath: As with the boiling method, immediately transfer the steamed eggs to an ice bath once they are cooked through.
The key takeaway for both methods is the immediate transfer to an ice bath. This stops the cooking process in its tracks, preventing the eggs from becoming rubbery and ensuring those coveted pale yellow, firm yolks suitable for your deviled eggs.
Mastering the Peel: From Shell to Smooth White
Even perfectly cooked eggs can be a nightmare if the shells cling stubbornly. While many tricks abound, a gentle approach is often the most effective:
- Gentle Cracking: Once cooled in the ice bath for 2-3 minutes, gently tap the egg on a counter surface until the shell cracks all over.
- Roll to Loosen: With light pressure, gently roll the egg over the surface to further loosen the shell.
- Peel Under Water: Start peeling from the wider end, where there's usually an air pocket. For any stubborn shell pieces, a quick dip or peel under a trickle of running cold water can help them slide right off. The water helps to get under the membrane, making separation easier.
With these techniques, you'll be left with pristine, smooth egg whites, ready to cradle your delicious filling.
Crafting the Irresistible Deviled Egg Filling
Once you have your perfectly cooked and peeled eggs, the next exciting stage is crafting the filling. This is where the magic truly happens, transforming simple yolks into a creamy, flavorful concoction that defines excellent deviled eggs.
Separating with Ease
The first step is to carefully separate the whites from the yolks. Cut each hard-cooked egg in half, either crosswise or lengthwise – the choice is yours, though lengthwise often creates a slightly larger "cup" for the filling. Use a small spoon to gently scoop out the firm yolks, placing them in a medium bowl. Be delicate to avoid tearing the delicate egg whites, as these will be your vessels for the delicious filling. For more fundamental techniques on egg preparation, you might find deviled eggs - Article 1 helpful.
The Art of the Mash and Mix: Avoiding Common Pitfalls
The texture of your filling is paramount. To avoid a lumpy or, worse, gummy filling, follow these steps:
- Mash the Yolks First: Before adding any other ingredients, thoroughly mash the egg yolks with a fork until they are completely smooth and free of lumps. This prevents the need for excessive mixing later, which can lead to a gluey texture.
- Don't Over-mix: Once you've added the other ingredients, mix just until everything is combined and smooth. If you prefer a slightly chunkier filling, stop just before it's perfectly smooth. Over-mixing is a common culprit for gummy, unappetizing deviled eggs.
Essential Ingredients: The Heart of the Flavor
While variations abound, most exceptional deviled eggs share a core set of ingredients that provide the perfect balance of creaminess, tang, and seasoning:
- Mayonnaise: This is the backbone of the creamy texture. Opt for a good quality full-fat mayonnaise for the richest flavor, though lighter versions or even avocado oil mayonnaise can work.
- Mustard: Classic yellow prepared mustard lends that signature tangy zip. For a more sophisticated flavor profile, consider Dijon mustard, whole grain mustard, or even a touch of spicy brown mustard.
- Acidity (Vinegar): A touch of white vinegar (or apple cider vinegar, even lemon juice) cuts through the richness of the mayonnaise and balances the sweetness, adding a bright counterpoint.
- Sweetness (Sugar): A small pinch of white sugar can surprisingly enhance the overall flavor, harmonizing the acidity and mustard. It's often the secret ingredient that makes a filling truly irresistible.
- Seasonings: Salt is non-negotiable – it brings all the flavors to life. Paprika not only adds a beautiful color but also a subtle, earthy flavor. Consider smoked paprika for an extra layer of depth.
Elevating Texture and Taste: Beyond the Basics
While the classic recipe is wonderful, adding a little extra texture can take your deviled eggs to the next level. Finely diced onion and celery, as featured in some beloved recipes, introduce a delightful crunch that contrasts with the creamy filling. The key is to dice them *very* finely so they integrate seamlessly without overwhelming the delicate flavor of the egg yolk. Some creative cooks also add finely chopped cornichons or capers for a briny pop.
Elevating Your Deviled Eggs: Creative Variations and Presentation
The beauty of deviled eggs lies in their versatility. Once you've mastered the basic technique, the possibilities for flavor variations and stunning presentation are endless.
Beyond the Classic: Flavor Adventures
While the traditional recipe is cherished, don't shy away from experimenting with flavor profiles to suit your taste or occasion:
- Spicy Sensation: Infuse your filling with a dash of hot sauce (like Sriracha or Tabasco), finely minced jalapeños, or a pinch of cayenne pepper. Garnish with a thin slice of jalapeño or a sprinkle of chili flakes.
- Herbal Infusion: Incorporate finely chopped fresh herbs such as dill, chives, parsley, or tarragon for a bright, aromatic twist.
- Smoky & Savory: Add crispy crumbled bacon bits to the filling or as a garnish. A hint of smoked paprika can further enhance the smoky notes.
- Gourmet Touch: Consider luxurious additions like a tiny drizzle of truffle oil, finely grated Parmesan cheese, or a spoonful of caviar for special occasions.
- Global Inspiration: Explore flavors from around the world – a touch of curry powder, miso paste, or even a pinch of za'atar can transform the familiar into an exotic delight. For more advanced recipes and unique twists, be sure to check out deviled eggs - Article 2.
Mastering Presentation for a 'Wow' Factor
Presentation is half the battle, turning a simple appetizer into a visually stunning masterpiece:
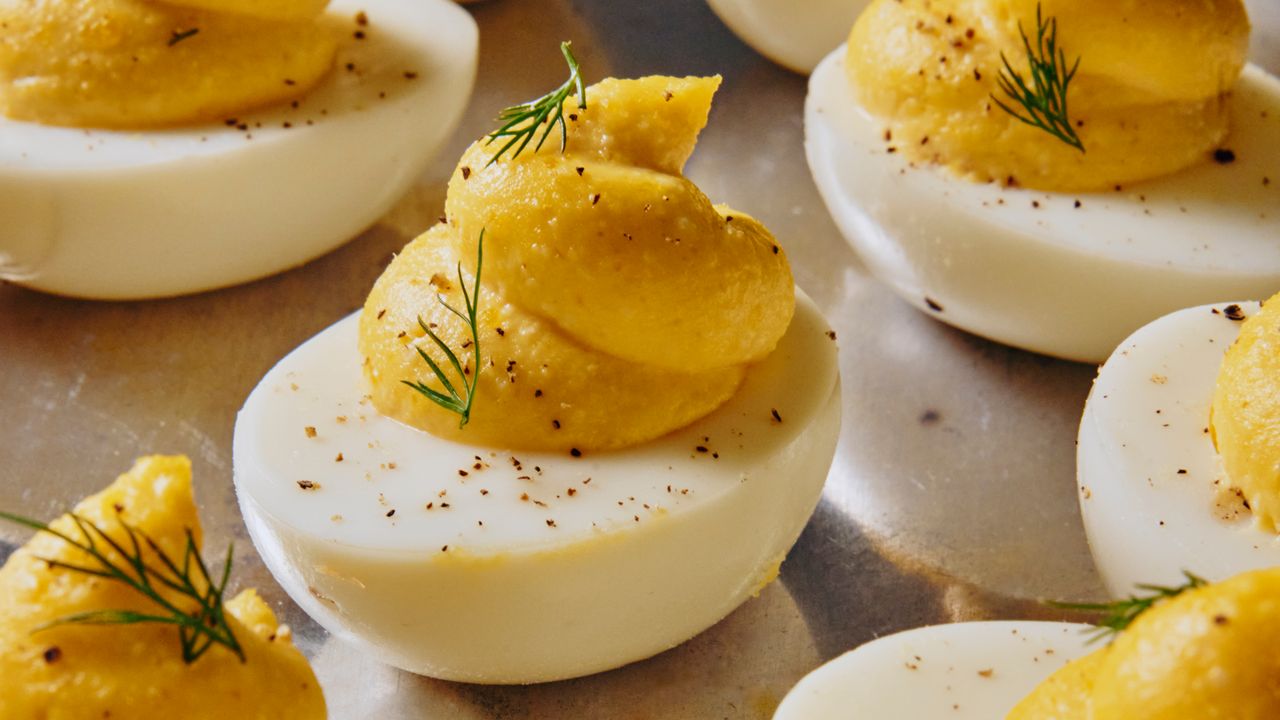
- Piping Perfection: For a professional, elegant look, use a piping bag fitted with a star tip (or a simple round tip) to pipe the filling back into the egg white halves. This creates beautiful swirls and ensures even distribution. If you don't have a piping bag, a zip-top bag with a corner snipped off works just as well.
- Garnish with Flair: A final garnish elevates the dish. A dusting of paprika (sweet, hot, or smoked), a sprig of fresh dill or parsley, a tiny chive batton, a sprinkle of flaky sea salt, or a few bacon crumbles can make all the difference.
- Serving Savvy: Arrange your deviled eggs on a dedicated deviled egg platter, or simply on a bed of fresh greens like arugula or watercress for a vibrant contrast.
Make-Ahead and Storage Tips
Deviled eggs are best enjoyed fresh, but you can certainly do some prep work in advance:
- Hard-Boil Ahead: Hard-boiled eggs can be prepared up to 5-7 days in advance. Store them unpeeled in the refrigerator.
- Filling Prep: The filling can be made 1-2 days ahead and stored separately in an airtight container in the refrigerator. The egg white halves can also be stored covered.
- Assemble Just Before Serving: For the freshest taste and best appearance, assemble your deviled eggs no more than a few hours before serving. This prevents the whites from drying out and the filling from becoming watery.
- Storage: Leftover deviled eggs should be consumed within 2 days and kept refrigerated.
Conclusion
From a humble egg to a sophisticated appetizer, the journey of creating perfect deviled eggs is both a science and an art. By mastering the fundamentals of egg preparation, understanding the nuances of flavor balance in the filling, and embracing creative presentation, you can transform this classic snack into an unforgettable culinary experience. Whether you stick to the beloved traditional recipe or venture into adventurous flavor combinations, the satisfaction of seeing your guests devour these creamy, savory bites is truly rewarding. With these insights and techniques, you're now equipped to create deviled eggs that will undoubtedly be the star of your next gathering, earning you accolades as a true deviled egg connoisseur.
